The Precision of Mitering Tile: Techniques and Tips
Mitering Tile for Perfect Corners
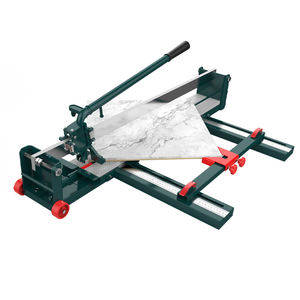
When it comes to achieving a professional finish in tile installations, mitering tile is an essential technique. Miter cuts, or angled cuts, are used to join two pieces of tile at an angle, typically 45 degrees, to create a seamless appearance around corners. This method not only enhances the aesthetic appeal of your project but also ensures structural integrity. To get started, you’ll need a wet saw with a diamond blade designed for making precise miter cuts.
Proper Tools for Mitering Tile
Before diving into the process, having the right tools is crucial. A quality wet saw equipped with a diamond blade is indispensable for making clean, accurate cuts. Additionally, invest in a good miter gauge to help guide your tiles into place at the exact angle required. Remember, accuracy here is key—minor deviations can be noticeable and affect the overall look of your tiled area.
Preparing Your Workspace for Mitering Tile
Creating a suitable workspace is another critical aspect of successful mitering. Ensure your work area is well-lit and free from clutter. Lay down protective coverings to safeguard both the floor and your materials. It’s also important to measure twice and cut once. Use a measuring tape and marking pen to outline where cuts will be made on each tile. Double-check these measurements; even small errors can lead to significant misalignments later on.
Techniques for Accurate Mitering Tile Cuts
To achieve clean, sharp angles when mitering tile, start by setting up your wet saw on a stable surface. Secure the tile firmly against the fence of the saw using clamps if necessary. Adjust the miter gauge to the desired angle (usually 45 degrees) and make slow, steady passes with the blade. Avoid applying too much pressure as this can cause chipping or breaking of the tile.
Troubleshooting Common Issues in Mitering Tile
Despite careful preparation, issues may arise during the mitering process. One common problem is uneven edges, which can occur if the blade isn’t perfectly aligned or if there’s vibration while cutting. To fix this, recalibrate your saw and ensure all components are tightly secured. Another challenge is chipping, particularly around the edges of the cut. Using a slower feed rate and ensuring the water flow is adequate can help prevent this.
Finishing Touches After Mitering Tile
Once all your tiles have been cut and installed, finishing touches like grouting become necessary. Choose a grout color that complements your tiles to enhance the visual continuity of the design. Apply grout evenly across the joints, being careful not to leave excess material on the surface of the tiles. Wipe away any smudges immediately with a damp sponge to avoid staining.
Maintaining Equipment Used in Mitering Tile
Proper maintenance of your tools is vital for consistent performance over time. Regularly inspect and replace worn blades, and keep your wet saw clean and free from debris. Lubricate moving parts as recommended by the manufacturer to reduce wear and tear. By taking care of your equipment, you’ll ensure longevity and continued precision in all your future projects involving mitering tile.
报错: 未找到这个表单

Automatic Continuous Edging Machine Th...

Bridge Stone Saw Scope of applicat...

Concrete Cutting Machine Concrete ...

Diamond Rope Saw Description: The f...
